Garden Vegetable Soup (Serves 4) zero points
2/3 cup sliced Carrot
1/2 cup diced onion
2 minced garlic cloves
3 cups fat-free chicken or vegetable broth
1 1/2 cups diced green cabbage
1/2 cup green beans
1 Tbsp tomato paste
1/2 tsp dried basil
1/4 tsp dried oregano
1/4 tsp salt
1/2 cup diced zucchini
Spray a large pot with nonstick cooking spray, heat. Saute the carrot, onion and garlic over low heat until softened, about 5 minutes. Add broth, cabbage, beans, tomato paste, basil, oregano, and salt; bring to a boil. REduce heat, simmer, covered, about 15 minutes or until beans are tender. Stir in the zucchini and heat for 3-4 minutes. Serve hot.
Chunky Chicken Salad Sandwiches (Serves 4) With a thin bun this is 12 points plus or you could also add 1 slice of reuced fat swiss cheese and it would be 14 points plus AND WORTH IT!!
1/4 cup reduced calorie mayonnaise (I use 1/2 cup Fat Free instead of half and half)
1/4 cup fat free mayonnaise
2 heaping Tablespoons honey mustard
1 medium clove garlic, crushed
2 1/2 cups cooked, diced chicken breast
1 1/2 cups red seedless grapes, sliced in half and then quartered
3 Tbsp chopped pecans
Combine mayonnaise, mustard and garlic in a small bowl. Place chicken, grapes and pecans in a larger bowl; add dressing and stir to coat. Yields 1 cup per serving. This will keep in the refrigerator for 2 days.
1, 2, 3 Pancake (Serves 1 or 2) 6 points plus for both pancakes if you make 2
1 packet WW oatmeal (vanilla almond is amazing)
2 Tbsp unsweetened applesauce
3 egg whites (I use egg beaters)
Mix and cook on a hot griddle that has been sprayed with cooking spray. Serve with sugar-free syrup.
More soon! I have some sewing things to show you when I have more time. TTFN!
peacock button picture

Thursday, January 27, 2011
Wednesday, January 26, 2011
Two of my favorite Weight Watcher recipes
I have been getting so many requests for delicious recipes that I decided to use this blog today to give you two of them. So here are two of my favorites:
Laughing Cow Chicken
1 pound skinless boneless chicken breasts
8 slices deli-style fat-free ham slices
4 wedges Laughing Cow Cheese - any flavor
1/4 package shake n bake - chicken (you can substitute italian bread crumbs, but it is not near as good)
1. Preheat oven to 400 degrees.
2. Place each chicken breast between 2 pieces of wax paper and pound to 1/4 inch thick (or you can slice each breast almost in half length-wise).
3. Place 2 slices of ham and one wedge of cheese on each chicken breast. I then flatten the cheese out so it spreads across the width of the breast.
4. Roll chicken up. Roll in the shake n bake and then secure with a toothpick.
5. Spray a cookie sheet with cooking spray and then lay chicken breasts on the cookie sheet.
6. Bake for 35 to 45 minutes or until juices run clear and chicken is browned.
Delicious!! Serves 4 and was 5 points, but I am going to guess about 8 points plus
Ginger Hoisin Burgers with Asian Slaw
1 pound ground lean beef (7 % fat or less)
1/4 cup dried bread crumbs (you can use plain or italian - both good)
1/4 cup chopped onion
1/4 cup + 1 Tablespoon Hoisin Sauce (this is with the asian foods in the grocery store)
2 Tablespoons reduced-sodium soy sauce
1 Tablespoon lime juice
1 Tablespoon honey
4 cups thinly sliced Napa cabbage OR instead of these next 3 items use a bag of slaw like I do
4 radishes
1 carrot, shredded
1. Combine beef, bread crumbs, onion, 1/4 cup of hoisin sauce and soy sauce in a medium bowl. With damp hands, shape mixture into 4 1/2 inch thick patties.
2. Spray a medium nonstick skillet with nonstick spray and set over medium-high heat. Add patties and cook 5-6 minutes on each side, or until your preferred doneness.
3. Meanwhile, whisk together the remaining 1 Tablespoon of hoisin sauce, lime juice and honey in a large bowl. Add the cabbage, radishes and carrots (or bag of slaw - I promise this is so much easier!) and toss to combine.
4. To serve we eat them on the thins type buns and add the slaw on top of the burger.
Even my picky eater Kaitlyn loves these!!
This recipe used to be 5 points per serving and serves 4, but now is probably 8 points plus. The thin bun adds on an extra 3 plus points for a total of 11 plus points.
Please let me know what you think of these recipes and ideas of other recipes you might be interested in. I have lots of tried and true recipes that are working for my family. Bon Appetit!
Sunday, January 23, 2011
FINALLY! A new blog
 |
| My first sewing project in January 2011 |
 |
| This is the back view |
 |
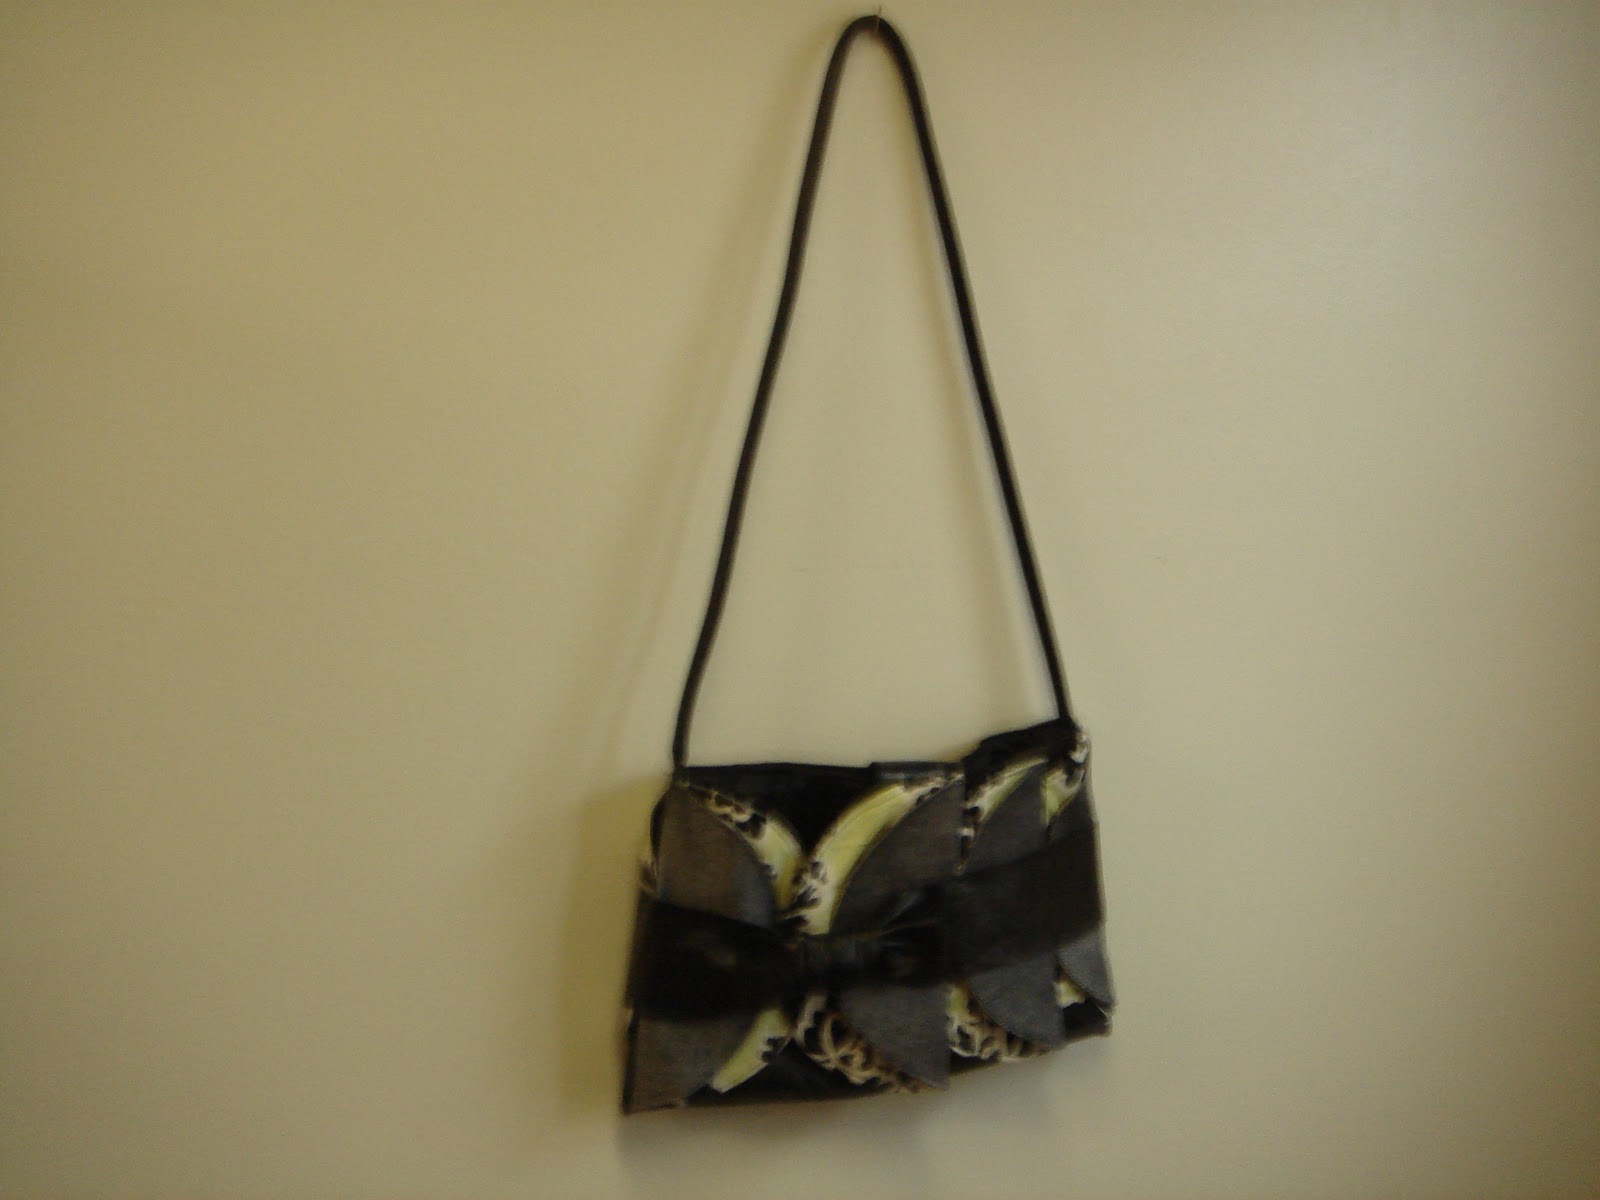
| This is the front view - I call it the TACO purse. Do you see it? |
 |
| My first pin cushion - it is a BUG! |
 |
| This is a very pretty jewelry bag |
 |
| This is my NEW camara case that I made for my camara. |
 |
| These are going to be made into pin cushions next. I bought the glass bowl for $.49 and the metal leaf for $.99 at the thrift store. Can't wait! |
 |
| I love this basket I made. |
 |
| This is for my "GrandDOG" - it is a bag holder for - you know. |
 |
| And here is the basket with muffins in it! |
 |
| This is a lunch bag - I think next time I will use lighter weight interfacing So here are the finished (and unfinished ) projects I have been promising. It took me alot longer to get the pictures taken than I thought it would - sorry. Alot of these were taken from the 2011 Sewing Calendar edited by Megan Smith. Gotta give credit where credit is due. A few are things I got from the internet and from now on I will try to only post about one per post. I want you to know that there are other things I have also sewn for people this month among them are: adding a ruffled layer to a dress for a high school vocal teacher's student, fixing the straps for my daughter's friend's chamber choir dress, hemming two pairs of pants for another friend, and whenever I am not doing anything else I have been making yoyos for a "something" I am making. I am not sure what it will be yet but I just learned how to make yoyos and I am having fun designing it - whatever it turns out to be! Well gotta go for now, but next time there will be a recipe for you to try. TTFN!! |
Sunday, January 16, 2011
This one is for YOU - Allison!
You know the old saying that the cobbler"s (shoemaker) children never have new shoes? Or something like that...anyway, my four beautiful, sucessful daughters did not learn any sewing skills from me. Sigh. Now was that my fault you may ask, or theirs? I honestly am not sure. They all took FACS in middles school just like everyone was required to do, but none ever expressed a desire to learn more. I guess you could say I also never pushed the issue with any of them either. They all have been busy good students who always had lots going on and little time to sew with Mom.It is only now as married adults I am being asked to teach them a basic skill of how to sew on a button. My button sewing should be legendary. You see the peacock picture at the top of this blog? It has 696 hand sew buttons on it. Each one was sewn on the right way. How is that, you ask? Read on.....
How To Sew On A Button
Most of my friends know that I have been trying to lose weight since April. I am a life time member of Weight Watchers who fell of the wagon and gained 65 pounds. Through hard work, weight watchers, a daughter doing it with me and keeping me on track, and 3 days a week of bootcamp exercise I had lost 63 pounds and was soooo close to my goal. The bummer is Christmas break happened and I ate more than I should have. We all do that - don't we? But the bad thing is that I had a hard time stopping eating all the junk left in my house after Christmas and 5 days at home last week due to snow days. Therefore I had a gain this week. Grrrrrr! But the thing I have learned through WW is all I have to do is start fresh this week and never give up. So here is the recipe I made for lunch today and it was yummy!!
Vegetable Pasta Soup
6 cups reduced salt V-8 Healthy Request Vegetable Juice
1 (14 1/2 ounce) can diced tomatoes with basil, garlic and oregano
1 package California Blend Frozen Veggies (has carrots, cauliflower and broccoli)
1 package Tuscan Blend Frozen Veggies (has carrots, broccoli, zucchini, italian beans and lima beans)
1 package Birds Eye Steamfresh Lightly Sauced Frozen Rigatoni and Vegetables with Tomato Parmesan Sauce
1 tsp garlic powder
2 cups of water
1/3 head of cabbage, sliced in to 1 1/2 inch strips
Parmesan cheese to sprinkle over soup in the boiwls
Combine the V-8, water, garlic powder, raw cabbage and canned tomatoes in a large pot. Bring to a boil. Add all the frozen packages of goodies and stir. Return to a boil. Reduce heat and simmer, uncovered, for 10 minutes (20 if you are using the cabbage). Ladle soup into bowls and sprinkle with parmesan cheese.
If you only eat about 1 cup each this will serve 8. If you eat 1 1/2 to 2 cups each it will serve 4. We forgot to sprinkle on the parmesan and we still LOVED it!!
Well that is all for today, but to get you to come back I will give you a teaser for tomorrow: I will tell you about the first 5 projects I have finished either from the calander or from the internet. Also, I will show you what I bought last night to make pin cushions out of. Can't wait!
- Buy a needle and thread. (I have to say this as I am pretty sure Allison does not own either one) ;o)
- Cut a piece of thread that is about you shoulder width or a little longer.. Thread your needle. If you have trouble with this, cut the thread end off at an angle (so it is pointed) and then do not touch the tip of the thread or else it will begin to fray.
- Bring both thread ends together and tie a knot (tying both ends together in that knot). If there is a tail of thread below the knot, cut it off.
- Starting on the underside (wrong side) of the garment put the needle into the fabric. Pull the thread tight untill the knot is snug at the fabric. Slide the button onto the needle. Holding the button in place, put the needle in the fabric back onto the wrong side. If you have a 2 hole button just repeat this process 4-5 times. If you have a 4 hole button repeat the process 4-5 times in two holes and then repeat the process in the other two holes. If you have a shank button (one that does not have holes through the button, but rather has a thing to sew through on the back of the button) repeat the process 4-5 times also but be careful not to take such large stitches that you will be able to see them on either side of the button.
- Bring needle up from the back to the front between the button and the garment. Hold onto the thread and tightly wrap the thread around the button (underneath the button in between the button and the garment) 4-5 times. This is your secret weapon to prevent your button from coming off any time soon.
- Bring needle back through the garment to the wrong side and you are ready to tie your knot and cut off the thread. Try one of these ways to do that: Take a very small stitch in place and before you pull it tight, take your needle through the loop. This makes 1/2 of the knot. Do it again and you are finished and can cut off the thread. The other choice is to cut off the thread leaving about 2-3 inches hanging onto your garment and then tie a knot by hand and then cut off the threads. Both are easy and both work for me!
6 cups reduced salt V-8 Healthy Request Vegetable Juice
1 (14 1/2 ounce) can diced tomatoes with basil, garlic and oregano
1 package California Blend Frozen Veggies (has carrots, cauliflower and broccoli)
1 package Tuscan Blend Frozen Veggies (has carrots, broccoli, zucchini, italian beans and lima beans)
1 package Birds Eye Steamfresh Lightly Sauced Frozen Rigatoni and Vegetables with Tomato Parmesan Sauce
1 tsp garlic powder
2 cups of water
1/3 head of cabbage, sliced in to 1 1/2 inch strips
Parmesan cheese to sprinkle over soup in the boiwls
Saturday, January 15, 2011
My very first post
Hello! This is my very first attempt at writing a blog. I plan to record my sewing journey for the following year. You see, I bought a sewing calendar for 2011 which has the viewer sew a different project every 3 to 4 days. All of the projects can also be found on-line and of course I will give credit to the creators. None of these are my own creations, but as with most sewers, they will have my own twist on the original. Most of the projects from the calendar I love, but some…not so much. Since I seem to spend hours on the web reading other people’s blogs and collecting sewing ideas I want to make, I made it my New Year’s Resolution to make all the projects from the calendar that I love and on the days there is one I am not so crazy about, I will make one of those saved stacks of projects I have been collecting for the past year. My two new obsessions seem to be pin cushions and fabric baskets, so expect to hear about those some days. I hope you will go on this journey with me and be my encourager. Who knows – I might even inspire you to use your creative side more!
Subscribe to:
Posts (Atom)